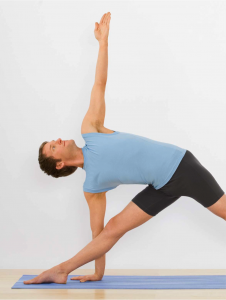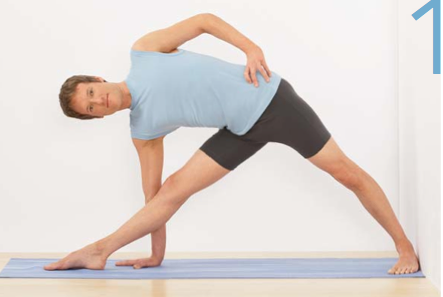
Trikonasana is a universally important component of our yoga practice in helping us to practice most other asanas with greater ease and intelligence. It teaches us how to extend the legs which is required for many more challenging asanas. We learn how to bear weight on a straight leg while keeping the thigh muscles engaged. Additionally the front leg is externally rotated which strengthens the muscles of the legs and brings flexibility and stability to the hip. In this way, the legs are prepared for proper alignment in other straight leg standing poses such as Ardha Chandrasana, Parsvottanasana, and Parivrtta Trikonasana. Trikonasana also stretches the hamstrings which prepares us for the practice of forward bends such as Uttanasana and Paschimottanasana.
Trikonasana can be one of the first poses that we do in our standing pose sequence whether we want the focus of our practice to be oriented towards forward bends, backbends, twists or inversions. The work of moving the tailbone and shoulder blades forward and opening the chest tones the spinal muscles required for all backbends. The firmness required in the back ribs when turning the chest and head towards the ceiling teaches us the how to work in twists such as Bharadvajasana and Marichiasana.
Trikonasana
The first time I attempted Utthita Trikonasana (Extended Triangel Pose), I felt free and long and confident that the pose was within my reach. However it then took another ten years of trying to find the balance between expansion and contraction to glimpse that feeling again.
One of the first standing poses that we learn, Utthita Trikonasana is iconic in its architectural structure. Tri means three and kona means angle and in the pose, we can see the formation of many triangles.
In tantric yoga philosophy, the sri yantra is the geometrical representation of the creation of the cosmos. An upward facing triangle represents aspiration towards the transcendental and an inverted triangle represents the source of energy and the root of life. When the two are connected, multiple triangles emerge signifying the web of existence.
In Trikonasana, we are seeking the yantric ideal of straight clean lines to access the union of our material and spiritual impulses. The material impulse helps us to be careful when practicing out of concern for our physical well-being whereas the spiritual impulse spurs us on to seek greater depth and intensity. As in all asanas, we learn to balance the dualities of courage and caution.
When done well, Trikonasana is stabilizing and freeing. We feel firmness in our legs, a lengthening of the spine, fullness in the chest, and freedom in the neck and shoulders. Trikonasana increases flexibility and strength in the legs and lower joints (ankles, knees, and hips) while extending the lower back. It can be a panacea for backaches. If you have tight hamstrings, forward bends can aggravate lower back pain but Trikonasana provides a safe method of stretching the legs while extending the back laterally. We also learn the movements in the upper body that prepare us for the practice of inversions, twists, and backbends.
HOW TO PRACTICE
The main triangle that can be observed in the pose is formed between the floor as the base of the triangle and the legs. If we think of the asana as architecture, the feet and floor form the foundation of the structure and as in the foundation of a building, the base of Trikonasana should be firm, balanced and stable.
The frame of the pose is supported by our bones and yet we have to use our muscles to align the bones. As a beginner, we are content to be able to reach our hand to the ankle or the floor but may do so by sacrificing the stability of our foundation.
While straightening the legs may not, at first, seem difficult to students who are more flexible, the challenge lies in the ability to straighten the legs without sinking into the lower joints. B.K.S. Iyengar said, in Trikonasana we need to “entwine the muscles to the bone” as if fortifying our foundation. From the feet we draw the thighs up towards the hip sockets. It is as if we are using our legs to lift the pelvis and feed the spine.
AT THE WALL
To experience the sturdiness of the foundation of the pose, practice with the outside edge of your back leg heel against a wall. Even though the torso is extending over one leg, the weight should be distributed evenly on both legs. The wall helps you to maintain your awareness on the back leg.
Spread your legs wide apart and place the outer edge of your left heel against the wall. Turn the toes of the left foot slightly away from the wall so that only the heel touches the wall. Turn the right leg out so that the knee faces away from the wall. The feet should be wide enough apart so that the right foot lands under the right hand when the right arm is extended to the side at shoulder level.
Keep the legs straight and firm, press the outer left heel into the wall and down into the floor while extending the torso over the right leg. The work of the left heel on the wall should not feel as though it is coming from the ankle or lower leg. Instead, see if you can firm the entire left leg up to the hip, press the inner left thigh towards the outer thigh to put power into the left heel from the entire left leg and hip. Only take your right hand as low as you can without losing the weight on the left outer heel. To come out of the pose, use the action of the left thigh and foot to help pull you up. Repeat the pose on the second side with the right foot against the wall.
BLOCK SUPPORT
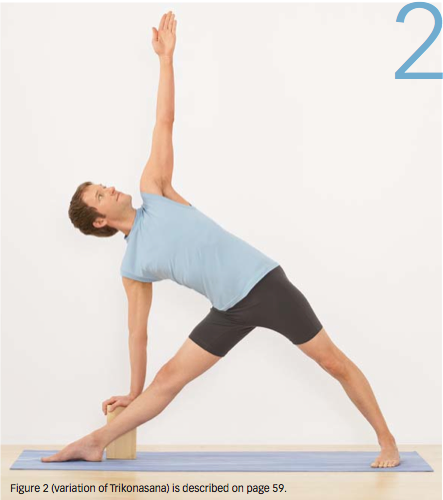
After you feel stable on the back leg, try the pose away from the wall. This time use a block for your hand to help you remain lifted in the legs.
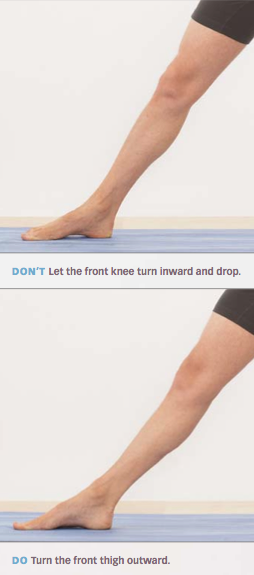
Separate the feet as wide apart as the hands with the arms extended to the sides. Turn the legs to the right and be sure to turn the right upper leg as much as you have turned the foot. You can look down at your right kneecap to see that it is facing over the middle toe of the right foot. Pull the right leg up from the ankle to the hip. This is where the muscular support for the bones is required. The muscles of the thigh and around the outer hips should feel as though they are gripping the bones and turning the upper leg out, pulling the thigh up and into the hip.
See if you can maintain the firmness on the left leg and the pressure on the left outer heel as you exhale and take your right hand down to the block. Push down on the block so that you don’t collapse onto the right hand and leg.
The muscles at the outer upper right thigh and hip region need to be especially firm to keep the leg rotated outwards and to bring the hips into alignment with the knees and ankles so that the right hip and buttock doesn’t project back behind you.
CAUTION
This is truly a study in straightening the legs. There is a difference between a straight leg and a locked knee. When the knee is locked, the heaviness of the body drops onto the knee or ankle, in which case you may even experience pain in the back of the knee. If you tend to sink into the front leg (right) knee, bend the knee slightly, turn the thigh out and then engage the thigh muscles while straightening the leg. Remember, the pose should not feel as though it is crumbling but rather that the foundation of the feet and legs are supporting the lift of the pelvis and upper body.
Keep both legs firm, extend your arms and come up on the inhalation and move your block to the left to repeat on the second side.
ON YOUR OWN
Now that you’ve felt the evenness in both feet as well as the strength, straightness and rotation of the front leg, you can start integrating those actions with the work of the upper body. You can try without the block but use what you have learned in the previous variations as a guide for how low you can take your hand. This is where the grounding element of the inverted triangle in the yantra must balance our aspiration. If you can’t reach the floor but feel you can go lower than the block, you can clasp your ankle with your hand.
Use the arms again as a measuring stick for the distance between the feet. Keep the left heel planted to the ground while extending to the right. When the rotation of the front leg, strong upward lifting action of both legs and firmness of the back leg and heel are achieved, you will feel a stability that gives freedom to the pelvic region. Take your tailbone forward and extend both sides of your torso over the mid-line of the right leg.
The contact of the right hand with the floor, block or ankle, forms part of the base of the pose and is a point on one of the triangles. As you have been working to engage the muscles of the upper thigh, firm the muscles of the upper right arm to draw upwards and feed the lifting of the chest and extension of the left arm to the ceiling. Extend the arms straight away from each other and broaden the chest.
There is a tendency when we first attempt Trikonasana to lean slightly forward so that we don’t fall back. Bring your torso in line with your legs and hips, roll both shoulders back as if you had a wall behind you and revolve the chest towards the ceiling. Indeed the back body from the outer edges of the right ankle, back left heel, outer right hip and shoulder blades should feel firm and stable like a wall that supports the front of the body.
As you carve the triangles with your body, perhaps you can glimpse the formation of an inner yantra at the connection and support of the two qualities of firmness and extension, creation and freedom.
