This article was published originally in Yoga International Magazine.
Keeping High Blood Pressure in Check
Chances are at least one person in your life – a family member, someone you work with, or a good friend – has high blood pressure and takes one or more pills a day to bring it under control. Why so likely? Because high blood pressure – what doctors call hypertension – affects one in three adults in the United States. Elevated blood pressure, which increases the risk of stroke, heart failure, and kidney disease, is often described as a “silent killer.” Recognizable symptoms do exist – fatigue, nosebleeds, nervous tension, ringing in the ears, dizziness, bursts of anger, headaches – but not generally until blood pressure is dangerously high.
Stress As the Culprit
Blood pressure – the force blood exerts against the walls of your arteries as it travels through the circulatory system – fluctuates during the day, increasing during exertion or stress and decreasing when the body is at rest. Most doctors agree that a blood pressure reading of less than 120/80 is ideal for adults, and diagnose hypertension when those numbers reach 140/90. The top number (the systolic pressure) refers to the amount of pressure in the arteries when the heart beats or contracts. The bottom number measures the diastolic pressure, or how much pressure remains in the arteries between beats, when the heart is relaxed.
Although several conditions can cause secondary high blood pressure (kidney disease, hormone abnormalities, type 2 diabetes), more often than not a high-stress lifestyle can lead to what doctors call “essential” hypertension, where there is no disease-specific cause.
Yoga, when performed mindfully, can reduce this type of stress-induced hypertension, while addressing its underlying causes. It pacifies the sympathetic nervous system and slows down the heart, while teaching the muscles and mind to relax deeply.
Pranayama can also be extremely beneficial. Research studies demonstrate that conscious breathing quickly lowers blood pressure. Practicing pranayama while lying down encourages the breath to arise smoothly from a relaxed state, without any force. If you do choose to sit, keep your spine straight and lift your chest, while keeping your head down in jalandhara bandha, so that there is no strain on the heart.
While a general yoga practice has a pacifying effect and can bring the nervous system into balance, some asanas work better than others for actually lowering blood pressure – and simple modifications make others more beneficial. For example, do cooling poses, such as forward bends where the head is supported – to bring a sense of calm to the head, neck, face, and diaphragm. Modify any standing poses in which the arms are normally extended overhead (like virabhadrasana I) by placing your hands on your hips. In trikonasana (triangle pose), look down toward the floor instead of up at the ceiling to keep blood pressure from rising. Steer clear of poses that compress the front of the diaphragm, such as dhanurasana (bow pose) and mayurasana (peacock pose), which can drive blood pressure up.
Anyone with untreated high blood pressure should avoid unsupported inversions, such as shirshasana (headstand pose) or adho mukha vrikshasana (handstand pose) – or any other pose in which they can feel pressure in the throat or temples, or that cause respiration to become heavy or difficult.
Practicing a modified halasana (plow pose) is a good way to experience the benefits of inversions without the potentially harmful effects, because you can learn to bear weight on the upper body and lengthen the sides of the neck without any strain. So if your blood pressure reads on the high side, stick to the modified version below.
Forward bends and other introverted asanas teach us how to quiet the brain and lengthen and soften the neck along the path of the carotid artery. When doing these poses to lower blood pressure, support the head, which has a cooling, calming effect on the whole body.
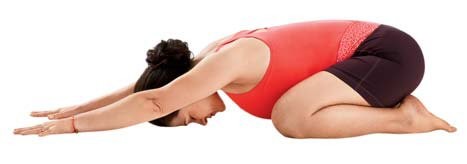
The following sequence is designed to prepare you to work toward the practice of inversions safely and without raising your blood pressure. At no time should you feel agitated or uncomfortable in any of these poses. If you feel flushed, hot, or dizzy while practicing, come out of the pose and rest in balasana (child’s pose) until you feel normal again.
End your practice with at least five minutes of shavasana, using a blanket, if necessary, to support the back of your neck so it stays long and your face can completely relax toward your chest.
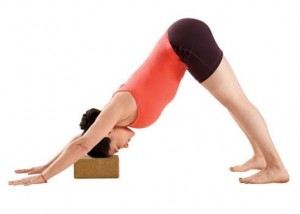
Supported Adho Mukha Shvanasana (Downward-Facing Dog Pose
Begin on your hands and knees and place two or three blankets (folded lengthwise) underneath your chest. Press the weight evenly through the hands as you straighten your arms and lift up through the inner edges of the arms. Release your shoulder blades away from your neck toward your hips, straighten the legs, and lift your pelvis up into adho mukha shvanasana (downward-facing dog pose). Separate your feet wider than hip-width apart.
Lift the pelvis away from the wrists and, keeping the legs firm, press the fronts of the thighs away from the torso toward the backs of the legs and lengthen your calves down toward your heels. Extend the inner arms from the wrists toward the shoulders as you move the shoulder blades away from the neck toward the pelvis.
Let the back of your neck release down so that your head (somewhere between the top of your forehead and the crown of the head) can rest on the support. If your head doesn’t comfortably reach your support, add another blanket. You shouldn’t have to bend the elbows in order to reach the blankets. If your neck feels compressed or your head jams into the blankets, lower your support.
When you can balance the dynamic action in the limbs and torso with the rest and relaxation in the head and neck, you’ll be able to hold the pose for a few minutes without feeling strain. When you come down, separate and bend your knees, sit on your heels, and release your head to the floor in balasana.
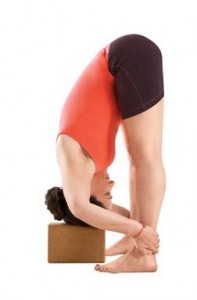
Supported Uttanasana (Standing Forward Bend Pose)
Separate the feet as wide apart as the narrow side of a yoga mat. Align the outer heels and little toes on the edges of the mat, and place a block at its tallest height between your feet and in line with your big toes. Depending on your proportions and the flexibility of your hamstrings, you may need more or less support. Stack a couple of blocks, if necessary, or put the blocks or a folded blanket on the seat of a chair to rest your head.
Bend forward, straighten your legs, and place the crown of your head on your support. Hold the ankles and spread the elbows apart from each other. Move your shoulder blades away from your neck, but let the back of your head descend toward the floor. Even though your head is resting on your support, keep the majority of your weight in your feet, balancing the weight evenly between the front, back, inside, and outside edges of the feet. Lift your thighs firmly and press the thighbones toward the backs of the legs without disturbing your head. The back of the neck should feel long and the chest broad. Breathe normally and stay in the pose for as long as you like, up to three minutes. Place your hands on your hips, inhale, and come up.
Supported Pashchimottanasana (Posterior Stretch Pose)
Sit on two folded blankets and extend your legs straight in front of you in dandasana (seated staff pose), feet hip-width apart. Place a bolster lengthwise on top of your legs, with a folded blanket on the bolster closer to your feet. Lift the sides of your torso up. If you find that you’re slumping backward, sit on more support. Extend forward and hold the outside edges of your feet with your hands. Lengthen your abdomen over the bolster and rest your forehead on the blanket.
If you can’t reach your feet, hold a belt around the feet; if your head doesn’t reach the blanket, rest it on a chair instead, padded with at least one blanket. Straighten your legs and press the thighbones toward the floor as much as you can without allowing your heels to lift. Relax the forehead and spread your elbows as you release the shoulders apart and away from your neck.
Extend through the backs of the heels and move your back ribs toward your front ribs down onto the bolster. Keep the back of the neck long and soft and relax your facial features. Hold for two minutes and then return to dandasana.
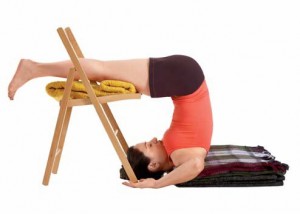
Supported Halasana (Plow Pose)
Experiment with this pose using blankets, a bolster, and a chair for support. If you feel any discomfort, simply come out of the pose and rest in shavasana. Stack three folded blankets at the end of your mat. The smooth, folded edges of the blankets should be in line with the edge of your mat. Open another blanket on the floor in front of your mat for the back of your head, place a bolster on the mat behind your blankets for your pelvis to rest on, and position a chair on the floor in front of your mat and folded blankets. Lie down with your shoulders, upper back, and base of your neck on the stacked blankets, your head on the blanket on the floor, and your pelvis resting on the bolster.
Reach your arms overhead and hold the feet of the chair. Push the chair away from you until your arms are straight. Bring your arms back by your sides and place your palms on the bolster. Rotate your upper arms outward and open the chest. Pressing your hands into the bolster, bend your knees toward your chest, lift your pelvis off the bolster, and take your feet overhead, toes onto the seat of the chair. Separate your feet as wide apart as the seat of the chair, toes curled under.
Clasp your hands behind your back, straighten your arms, and roll onto the outer front edges of your shoulders. Press your wrists into the bolster and lift the sides of your chest away from the floor. Relax your throat and allow the back of the neck to softly lengthen.
Pressing your toes down, lift the fronts of your thighs away from your head and straighten your legs. Release the clasp of your hands and rest the backs of your hands on the floor besides your head, elbows bent at a 90-degree angle. Keep your legs active but your head and neck passive, and your throat and face completely relaxed. To come down, bend your knees and slowly roll your upper, middle, and then lower back to the floor, keeping your head down. Rest on your back for a minute before rolling to your side to sit up.
Supported Setu Bandha Sarvangasana (Bridge Pose)
Sit on the front end of a bolster and belt the tops of your thighs together. With your knees bent and your feet on the floor, lie back onto the bolster. Using your feet to push against the floor, slide off the bolster just until your shoulders reach the floor and are at the same level as your head. Then extend your legs straight, backs of the heels on the floor.
Roll the outer edges of the shoulders underneath you and broaden your chest as you lengthen your arms alongside the bolster. Turn the upper arms out and the palms toward the ceiling. If your lower back aches or feels compressed, elevate your feet on a support and lengthen the sacrum and buttocks toward your heels.
Relax your throat and allow the root of the tongue to descend toward the back of the throat. You can close your eyes and gaze inwardly toward your chest, so that your forehead and cheeks soften and release completely. Relax the area between the eyebrows and around the temples.
Stay in this pose for as long as you like – up to 10 minutes; you should feel completely relaxed. On an exhalation, bend your knees, push your feet into the floor and slide off the bolster until your entire back comes to the floor. Rest the backs of your legs on the bolster for a few moments and then roll over to your right side and sit up.
After sitting up, you can cross your legs and bend forward to rest your forehead on the bolster. If your head doesn’t reach, elevate the support. Hold for a half a minute and then change the cross of your legs and repeat on the other side before sitting up.
