Originally published in Yoga International Magazine.
This article has been translated into Spanish and published by Om Yoga Venezuela Magazine (page 28).
WRIST RELIEF
 Stabilize the shoulders and upper back to free your smaller joints from the strain of repetitive movement.
By Marla Apt
Our hands are one of our primary organs of action—we use them for basic survival, recreation, communication, even creative expression. An injury in the hand or wrist can be debilitating and the healing process elusive. Because many of our interactions with modern conveniences involve repetitive movements—such as typing, texting, or mousing—one of the most prevalent types of wrist ailment today is a repetitive strain/stress injury, or RSI. Many common wrist conditions, such as carpal tunnel syndrome and tendinitis of the wrist, fall under this category.RSIs stem from excessive and continuous stress on the musculoskeletal system, often brought on by poor postural habits, as well as workplace ergonomics. When the shoulders and upper back don’t provide a supportive structural base for arm movements, the burden of the activity may fall on the smaller joints. Furthermore, poor alignment in the shoulders and upper back can constrict nerves in the arms, which can manifest as pain, swelling, and numbness in the wrists.Yoga helps us engage in our daily activities in a less stressful and harmful manner. First, we address the causes of injury by slowing down and observing ourselves and our habitual patterns. Then we can develop new patterns that are healthier and more conscious. Specifically, yoga can assist with healing RSI in the wrists by working on alignment in the upper body, so that the larger muscles in this region can better support and guide movements of the elbows, wrists, and hands.
Asana for RSI?The following asanas will help to develop mobility and strength in the shoulders and upper back to minimize nerve compression and stress on the smaller joints. In all of these poses, the upper trapezius muscles (which attach at the base of the skull and run down the neck to attach at the clavicles) should feel like they are releasing down the back, so that there is no congestion near the base of the neck, and the sides of the neck are free to lengthen. This aids in counteracting the imbalances of the typical slumped forward posture many of us assume in front of the computer, in which the shoulders are pulled forward and down, the tops of the trapezius muscles become hard and creep up toward the skull, and the head projects forward.
We’ll begin the sequence with the wrists in a neutral position, and work toward safely bringing the wrists into greater degrees of extension and, eventually, weight-bearing positions. Regular practice of these poses progressively prepares the upper body for asanas that are more challenging to shoulders, elbows, and wrists, such as chaturanga dandasana (four-limbed staff pose), or adho mukha vrikshasana (handstand).
1. Urdhva Hastasana?(Upward Hands Pose)
Stand with your back against a wall in tadasana. Separate your feet hip-width apart and parallel to each other, a couple of inches away from the wall. Bring the weight back into the heels of your feet and lengthen the buttocks down the wall so that you don’t arch your lower back. Lift the front and sides of your torso and open the chest. Roll the outermost corners of your shoulders back against the wall so that you can feel your chest broaden.
With your arms straight, extend them in front of you, parallel to the floor, with palms facing each other. Pull your shoulders back into the wall to bring the shoulder blades down the back. Then raise your arms overhead; your hands may or may not reach the wall, depending on the range of motion in your shoulders. Keep your arms firm and straight, and as you reach them toward the ceiling, release your shoulders and shoulder blades down the wall. Extend the side ribs up toward the hands without moving your lower back, thighs, and waist away from the wall.
Repeat the pose, this time bringing the arms up from the sides, focusing your attention on the rotation of the upper arms and shoulders. Extend your arms straight out to the sides in line with your shoulders, palms facing down. Extend the inner edges of the arms from the center of your chest until you feel the biceps lengthening toward your wrists. Lift the sides of your chest, rotate your upper arms out from the shoulders, and turn the palms to face the ceiling. This rotation should feel like it is originating from your shoulder blades moving down, in, and forward toward your chest. Raise the arms overhead as you roll the triceps forward away from the wall and the biceps back toward the wall. Lift the outer edges of your armpits toward your fingers, and, without dropping the arms, release the trapezius muscles away from your ears. Exhale and lower your arms down by your sides into tadasana.
2. Urdhva Baddhanguliyasana ?(Upward Bound Fingers Pose)
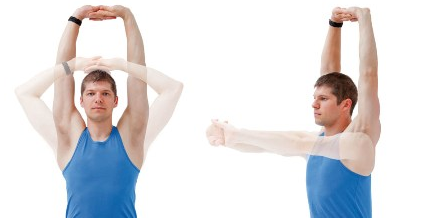
In the first variation of this pose, we’ll focus on how to extend the arms without tightening the trapezius muscles. From tadasana, interlock your fingers snugly at the webbing and rest the backs of your hands on top of your head with palms facing up. Release the tops of the trapezius muscles down your back, away from your neck, as you begin to straighten your arms toward the ceiling. The moment you find that the top trapezius muscles tighten (even if only on one side), pause and allow them to soften before proceeding further. Rather than tightening the shoulders to straighten the arms, see if you can hug the bones of the upper arms with the triceps. Exhale, unclasp the hands, and release the arms down by your sides.
Now repeat the pose, focusing on opening the sides of the chest and stretching the fingers and wrists. Change the interlock of your fingers so that the opposite index finger is on top. (Don’t worry if this feels awkward.) Bring the backs of your clasped hands to your chest, and slowly stretch your arms straight out in front of you, parallel to the floor. Push out through the base of the fingers and broaden the heels of the hands. Make the outer arms firm, and straighten the arms until you feel the inner arms stretch. Keep the arms completely straight, and raise them overhead. As you lift the wrists higher toward the ceiling, raise the sides of your rib cage and open the armpits, spreading and lifting them toward the hands. Open the palms of the hands wide and try taking your hands further back, so that the arms come beside or even behind your ears. As you bring the arms further back, move your shoulder blades and upper back forward toward your chest without pushing your bottom ribs and lower back forward. Keep your arms straight and firm, and without lowering the palms, release your trapezius muscles down. Exhale, unclasp the hands, and bring the arms forward and down by your sides back into tadasana.??
3. Ardha Parshva Hastasana?(Half Sideways Hand Pose)
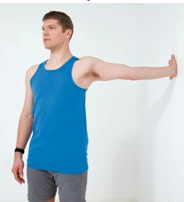
Stand in tadasana, one arm’s distance away from a wall, with your left side parallel to the wall. Place the palm of your left hand on the wall in line with your shoulder, and turn the hand out so that the middle finger is pointing behind you. (If you find this challenging on your wrist, you can point your fingers up toward the ceiling.) With your left elbow slightly bent, turn the upper arm out (in the same direction as the hand) from the shoulder socket. Press the entire palm of the hand into the wall, including the bases of your fingers and all your finger pads; be especially aware of maintaining pressure through your index finger. Move your left shoulder blade in, drop the left shoulder back and down away from your ear, and gently straighten your left arm as you turn your chest away from the wall. It should feel as if you are attempting to push the wall away from the center of your chest. Hold the pose for about two minutes, and repeat on the other side.
4. Bhujangasana at the Wall?(Cobra Pose Variation)
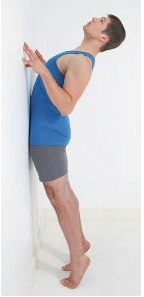
This standing version of bhujangasana gives you the benefits of the prone backbend—strengthening the upper back, relieving pressure in the shoulders and neck, and counteracting the forward bending of daily activities—without any weight on your wrists.
Stand approximately six inches away from a wall and press your pubic bone against the wall; place your fingertips on the wall at shoulder height. With straight legs, lift your heels high off the floor and draw your tailbone toward the wall. Open your chest, and roll your shoulders back away from the wall and down toward your buttocks. Draw the shoulder blades down and forward into the chest. The bottom edges of the shoulder blades should feel like they are coming closer to each other as you lift the sides of the chest up. Lift your lower abdomen toward the top of your sternum and isometrically drag your fingers toward the floor, as if you’re trying to pull the wall down with your fingertips. If your chest is open and your neck feels free, you can look upward. Hold the pose for one minute, or for as long as you feel strong and open; then rest and repeat.
5. Bharadvajasana I ?(Pose of Sage Bharadvaja)
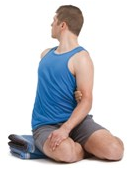
Sit on two folded blankets and bring both feet to the outside of your left hip. Place the top of your left foot on the arch of the right foot, with the left toes pointing straight back and the right toes pointing to the left. Keep both knees pointing forward. If this is challenging for your knees, try sitting up on more support.
Drop the left hip down so that the pelvis is level. Bend your right elbow, take your arm behind your back, and clasp your left upper arm with your right hand. Roll the right shoulder back. As you turn to the right, cross your left hand in front of you and place it as close to the outside edge of your right knee as you can reach. Inhale, and lift the sides of the chest; exhale, and turn your chest to the right. Keep rolling the right shoulder back as if the right arm and shoulder were leading the twist. Keeping the chest broad and level, exhale, and turn your head to look to the right. Hold for 30 seconds; then return to center on an exhale, release your legs, and change sides.
6. Hands and Knees Pose
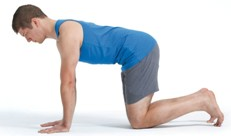
Finally, we’ll explore proper shoulder and arm alignment in a pose that places weight on the wrists. It is important to practice weight-bearing asanas on a firm surface (soft surfaces can cause the wrists to overextend) and to distribute the weight throughout the hand, so that you don’t collapse onto the wrists.
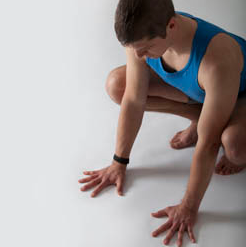
Come onto your hands and knees with your hands under your shoulders and knees under your hips. Press the whole palm and all of the finger pads flat on the floor and lift the forearms up away from the wrist; it should feel like the skin on the palm of the hand is lengthening away from your wrist toward your fingertips. Straighten your arms, and turn your upper arms out. Roll your shoulders back away from your ears, spread the collarbones, and draw the upper arms up into the shoulder sockets.
If you find that this pose bothers your wrists, you can use a yoga wedge or the folded edge of a mat under the heels of the hands. Both of these modifications will elevate your wrists higher than your fingers, allowing you to distribute the weight throughout the hand, so that there is less pressure on the wrist joint.
If you find that your wrists feel strong here, you can deepen your work with shoulder rotation and wrist mobility by trying the pose with your hands turned out, fingers pointing away from each other. To further stretch the inner arms and increase flexibility in the wrists, repeat the pose with your hands turned all the way out, so that your fingers point toward your knees.
If you don’t feel strain in any of these variations, you can apply your newfound awareness of how to integrate the work of the shoulders, arms, and wrists into other weight-bearing asanas that progressively increase the angle of wrist extension and the amount of weight through the arms: for example, adho mukha svanasana (downward-facing dog pose), chaturanga dandasana, bakasana (crane pose), and urdhva dhanurasana (upward bow pose).


