Paschimottanasana means the intense stretch of the west or backside of the body. It is an iconic forward bend that is intense and humbling in its simplicity. Although this is a pose that students who are relatively new to yoga learn, it can take many years of practice to master.
When I first began yoga, I took a class in which the teacher asked us to perform Paschimottanasana. When I pulled my head down to touch my legs, my teacher told me that I had reached the goal of the pose. Even in my sophomoric state as a yoga student, I knew that there had to be more to it. I was reminded of this early class recently when I had the opportunity to study with Geeta Iyengar (B.K.S. Iyengar’s daughter). She held us in Paschimottanasana for several minutes while giving intricate instructions that brought a whole new quality of extension, freedom and depth to the pose. Whether or not you can bring your torso and head in contact with your legs, you can experience inner space and deeper insight through the practice of this pose.
In Paschimottanasana, you are folded upon yourself into a naturally introverted state. The work in this inward pose requires patience and discipline. In yoga philosophy the path consists of what B.K.S. Iyengar refers to as the two wings of yoga, abhyasa (practice) and vairagya (detachment). Abhasya requires will, informed effort and knowledge. Vairagya involves reflection, stillness and surrender. The two wings must work in concert with each other.
You can experience these two aspects of yoga in the practice of Paschimottanasana. Although in the final classic version of this pose the entire front of your torso and head rests on your legs, due to stiffness you may have to surrender your concepts of achieving the outward shape of the asana in order to enter into the inner depth of the experience of this forward bend. Vairagya is a kind of detachment from the final result of your actions. When you are engaged in Abhyasa, Vairagya will keep your efforts in check.
While the disciplined effort of abhyasa is used to break through your stiffness in this pose, a surrender of tension is also required. The goal is not to bend forward from the spine but to extend forward so that the front and back of your torso lengthen evenly. The folding should occur at the hips, not the spine or waist. You will feel the stretch in the back or west side of the body but the front of the body needs to make space to elongate the spine. If you tighten your abdomen and chest and try to push your head downward, you will feel like a pill–bug coiled in a tight ball rather than the freedom of intimate contact with yourself. You must find a balance between your efforts and surrender. Being either too forceful or too passive can cause you to strain your back or injure your hamstrings.
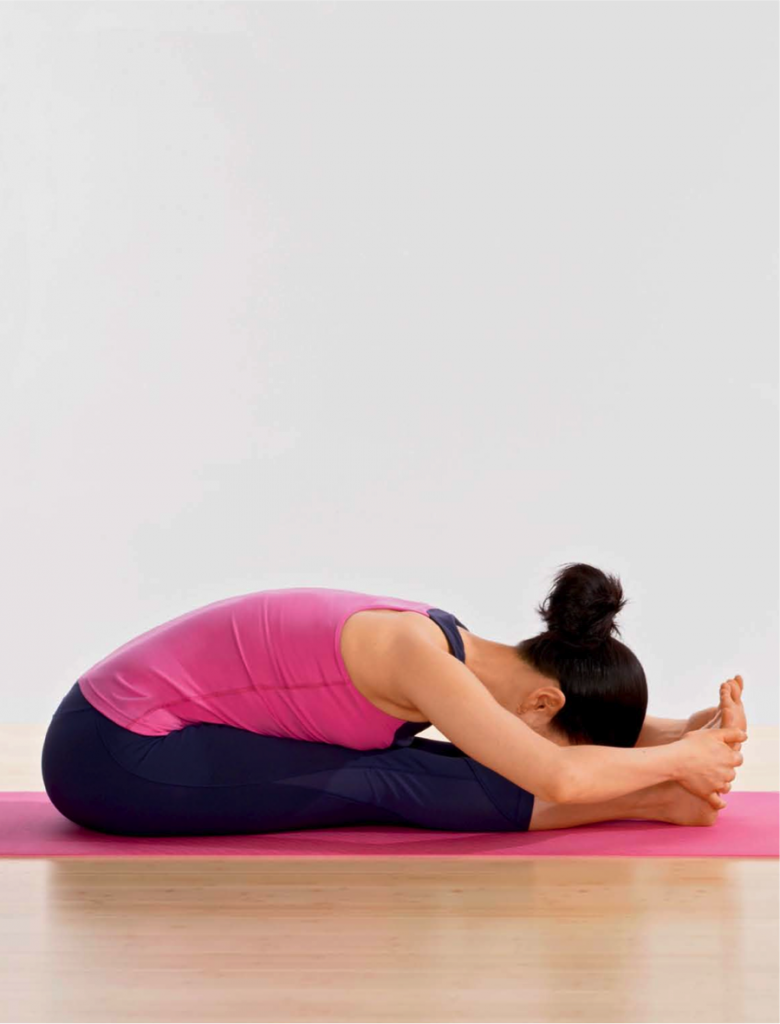
When done well, forward bends can help regulate the digestive system, calm your mind and nerves, relieve headaches and menstrual cramps, and increase agility in your hips, legs and lower back. Even if your head doesn’t reach your legs, you can reap the benefits of Paschimottanasana. The head should rest on the shins only when your abdomen and ribs are also resting on the legs. You don’t want your head to hang below the level of the chest. If in the final variation of the pose (photo #1) you cannot extend that far forward, you can place folded blankets, a block or bolster on your legs to support your forehead. If you are very far away from reaching your legs, you can use a chair to support your head.
1st Variation:
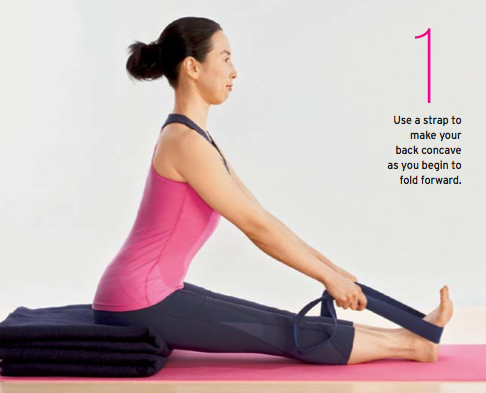
In this variation, you are practicing the concave back version; this is the first phase of Paschimottanasana and most forward bends. The belt and blankets provide support to give maximum height to the spine and allow for freedom in your hamstrings.
Sit in Dandasana, staff pose on two folded blankets with your legs straight and your spine lifting straight up perpendicular to the floor, hands pressing down besides your hips. If you find that you cannot sit upright in this position (your sacrum or lower back are rounding or you cannot straighten your legs) use more blankets underneath your seat. This is the foundation for Paschimottanasana and therefore it is necessary that you be able to sit erect before proceeding. Press your thighs into the floor and lift the sides of your torso up. Move your back ribs and spine forward to the front body.
Place a belt around your feet and hold the sides of the belt with each hand. Start with your torso in an upright position. Press your legs firmly down into the floor and on an inhalation, lift the entire front of your torso from the bottom of the pelvis to the throat. Pull on the belt as if drawing your arms back into the shoulder sockets and lift the chest up as if you were trying to take your ribs above the level of the arms. Then walk your hands down the belt closer to the feet maintaining the lift of the front body.
Don’t let your knees or feet turn out or become loose but keep your legs firm. Press the entire inner edge of each leg into the floor and extend the back of your heels away from your pelvis. As your calves reach forward in the direction of your heels, your hamstrings should reach back towards your buttocks. As if you are trying to push your blankets back with your buttocks, take your buttock bones back and spread them apart from each other. Lift the lower spine upward from the base. Match the lift of your back body with the length in your front by lifting the lower abdomen.
Keep your hands separate so that you can broaden the chest. You are using your arms to help engage the back-side of your body where you may especially feel the effort in your middle back.
If you find this variation very challenging, continue practicing this version before proceeding. This will help stretch tight hamstrings muscles and safely train the lower back to extend forward. If you suffer from lower back problems or are very stiff, stick with this variation.
2nd Variation:
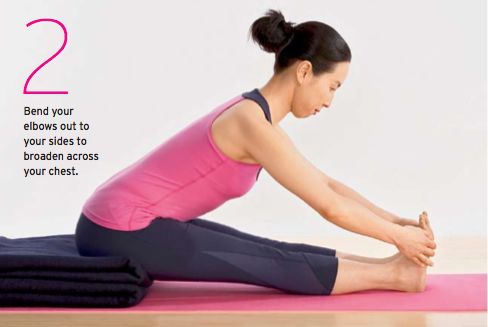
Now that you have brought your torso closer to your legs while creating length in the front of your body, you can try to extend further forward. In this variation, you will use a block to help extend the sides of your torso more and to practice the actions of the upper body, neck and shoulders. Since the block is slightly wider than your feet, it helps you to widen across your chest and shoulders. If you cannot reach the block, hold the sides of your heels instead or continue to use the belt.
Place a block on its side behind your feet. Extend your arms straight up towards the ceiling to lift the sides of your ribcage and waist up. On the exhalation reach forward and clasp the sides of the middle of the block or hold your outer heels if you can’t reach the block. Work your arms and back as you did in the first variation to make your back concave. Flatten your thighs into the floor and move the buttocks back as you inhale and lengthen the abdomen upward towards your chest. Broaden the top chest region so that the shoulders and collarbones don’t tighten around the neck and throat.
On the exhalation, begin to bend your elbows to the sides and lengthen your torso towards the feet. In this variation, you are not trying to take your head down to your legs but it should feel as though you are aiming to reach the navel and sternum forward to the toes. Push your inner heels into the block as you widen your elbows to the sides, keeping the top chest broad. Spread the shoulders away from each other so that your upper back feels wide as well. Pull the sides of your waist forward towards your side ribs, the side ribs towards your armpits and the armpits (not your shoulders) towards your elbows. You should maintain an element of working the back ribs towards the front ribs as in the concave back variation so your back doesn’t form a hump shape and to maintain the length of your frontal torso. If you find that your abdomen is tightening, lift up slightly, extend your legs and lift your ribs away from your abdomen so as to stretch the abdomen forward.
3rd Variation:
If you were able to keep yourself long while going forward, you can now attempt the next version of the pose, which involves going down while extending forward. If you need support under your buttocks in order to sit upright in dandasana, keep something underneath you in this version.
As in the previous version, lift the arms skyward to open your front body. Exhale, extend forward and clasp your heels with your hands. Lift your chest and begin by making your back concave again. Pull the outer edges of your feet towards your pelvis as you push forward through your inner heels. Broaden the soles of your feet.
On the next exhalation, bend your elbows to the sides and begin pulling your torso forward. Turn the tops of your thighs inward and press them strongly down so that you feel your hamstrings lengthen and widen on the floor. Spread your buttocks apart as you contract your outer thighs and hips closer to each other. From the top of your buttocks extend your entire lower back towards your head. It should feel like your hamstrings are going back while your spine is going forward.
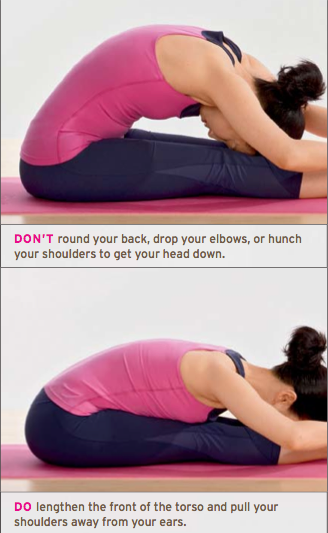
Cut your back ribs downward away from the ceiling to bring your front ribs closer to your thighs. If you feel like your bottom ribs are stuck to your abdomen, you are folding from your waist rather than your hips. You can lift upward slightly to free your lower abdomen, spread the diaphragm and extend forward towards your chest. Spread the upper arms and shoulders as you move the upper back down towards your legs to open the chest. As in the concave back variation, spread your collarbones to the sides. Don’t squeeze your shoulders together but move them to the sides and towards the pelvis, away from the head.
As you take your head down, keep the sides of the neck long. Don’t drop the elbows but keep them level with the shoulders. If your head doesn’t reach your legs or if you find that the throat is constricted, the chest is closing, or your head is much lower than your chest, place something on top of your shins to support your head. The back of the neck should be parallel to the floor, not diagonally slanting downward.
Although you’re working your arms and legs to draw yourself forward and downward, your shoulders, neck, abdomen and lower back should not feel tight.
You will find that you cannot do all of these actions at once. This pose teaches patience and how to work intelligently with the breath. On the inhalation, you can focus on lengthening the front of your torso and the work of your legs and on the exhalation you can focus on extending further forward. On the exhalation and at the end of the exhalation you also experience a few moments of release of tension to go deeper into the pose without aggression. This release is an important component of forward extensions in order to create inner space and freedom.
Benefits:
Anxiety
Stretches hamstrings and back
Menstrual cramps
Headache
Contraindications:
Sciatica Pain
Depression
Pregnancy

